Estimated reading time: 8 minutes
Table of contents
- First Blog Post in a While
- I Wanted Something Simpler than a VPN
- The Idea: Set Up a Minimal SSH Jump Host
- Step 1: Getting Started: The Base System
- Step 2: Securing the Gateway: Hardening SSH
- Step 3: Building the Wall: Modern Firewalling with nftables and SSHGuard
- Step 4: Keeping it Fresh: Automated Updates
- Step 5: Using the Jump Box in Practice
- The Payoff: Ridiculously Low Resource Usage
First Blog Post in a While
Wow, it’s been a while since I’ve written a blog post. I can’t even remember the last time, and I’m pretty sure that was for someone else’s website with the help of Yoast SEO. I’ve been meaning to document the various little projects I work on, and I did mostly on my private Gitea (some is also on GitHub), but figured, why not do it in a blog post? This way, I have a record for myself, and I can share it with the community. Hopefully, others can find it useful, learn from it, or maybe even teach me a thing or two if they have comments that can improve what I did.
I Wanted Something Simpler than a VPN
So, for my first post in a long time, let’s dive into a recent project. For a while now, I’ve been looking for a simple, secure way to access my home network and browse the web securely when I’m on the go. As a security measure, I have my firewalls configured so that all my (internal) servers, VMs etc. to only accept SSH connections from my home IP address. This is great for security, but it makes remote access a challenge. I’ve used WireGuard, and while it’s fantastic, managing keys and peer configurations across all my devices can sometimes feel like more overhead than I need. I wanted something simpler.
The Idea: Set Up a Minimal SSH Jump Host
This led me to an idea: Why not build a minimal SSH jump host? It would give me a secure tunnel for my traffic without the complexity of a full VPN setup. This project also gave me the perfect excuse to play around with Alpine Linux.

I’ve read about its incredibly small footprint and how it’s a good idea to use it as a base for Docker containers, so I was curious to see just how lightweight it could be. Note that Alpine Linux isn’t the best choice for a wide variety of software as it has been shown to run noticeably slower on Alpine Linux compared to other distributions, in part due to its usage of musl libc instead of glibc, but more on that in a later post, as I’ve found a solution for that challenge during the migration of my WordPress site from a TurnKey Linux WordPress container to an Alpine Linux container.
I decided to set this up in a Proxmox LXC container. Here’s a walkthrough of how I built my own secure, ultra-lightweight jump box.
Step 1: Getting Started: The Base System
The first step was to get a barebones Alpine Linux system ready.
Initial Update and Upgrade
Right after the initial install, or creating the LXC container from the available Alpine Linux template in my case, the first thing I always do is get the system fully up to date. We can update and upgrade with a single line like this:
apk update && apk upgrade
Installing and Enabling SSH
With the system up-to-date, I installed the OpenSSH server and made sure it would start automatically on boot.
# Install the package
apk add openssh
# Enable and start the service
rc-update add sshd default
rc-service sshd start
Creating My User Account
For security – and mistakes that will happen – I never operate directly as root. I created my own user account, for the purposes of this blog post: myusername, and gave it sudo privileges so I could perform administrative tasks securely.
# Install sudo
apk add sudo
# Create the new user
NEWUSER='myusername'
adduser -g "${NEWUSER}" $NEWUSER
Grant Sudo Access
echo "$NEWUSER ALL=(ALL) ALL" > /etc/sudoers.d/$NEWUSER
chmod 0440 /etc/sudoers.d/$NEWUSER
Setting Up SSH Key Authentication
To log in securely without a password, I set up SSH key-based authentication.
1. On my local machine, I generated a new SSH key. I chose ed25519 as it’s modern and secure.
ssh-keygen -t ed25519 -C "myusername@mylaptop"
2. Still on my local machine, I used the ssh-copy-id utility to securely copy my new public key to the jump box. It prompted me for the myusername password I created during the adduser step.
ssh-copy-id myusername@<server_ip>
Quick Login Test
Before locking things down, I did a quick check from my laptop to make sure I could log in as my new user with the SSH key and that my sudo privileges were working correctly.
# From my local machine
ssh myusername@<server_ip>
Once logged in (this time without a password prompt), I tested sudo by trying to list the contents of the /root directory, which is normally inaccessible.
# On the jump box, as myusername
sudo ls -l /root
It prompted me for my password and then worked, showing me the contents of the root user’s home directory. Success! With the basic user account and sudo confirmed, it was time to harden the server.
Step 2: Securing the Gateway: Hardening SSH
A jump host’s primary attack surface is its SSH port, so hardening the configuration is a top priority. I performed these next steps as the root user on the jump box.
1. I used sed to make a couple of key changes to the /etc/ssh/sshd_config file. First, I disabled root login entirely. Then, I made sure TCP forwarding was enabled, as this is essential for the ProxyJump feature I planned to use.
# Disable root login
sed -i \
's/^#PermitRootLogin prohibit-password/PermitRootLogin no/' \
/etc/ssh/sshd_config
# Enable TCP Forwarding, which is required for ProxyJump to work
sed -i 's/AllowTcpForwarding no/AllowTcpForwarding yes/' /etc/ssh/sshd_config
2. (Optional but Recommended) Disabling the Interactive Shell
For a true jump host, a user doesn’t need an interactive shell; they just need the ability to forward traffic. I added a ForceCommand to my SSH configuration. This is a powerful security feature that prevents a user from getting a shell after logging in. They can still use SSH for tunneling (ProxyJump and SOCKS proxies), but they can’t execute commands. This felt like the right move for a server dedicated to this single purpose. However, I did this after I added all my SSH keys, because I use a different key per device, so I can remove that key when the device gets lost/stolen/broken.
Be aware that you need access to the terminal for things like maintenance, you won’t be able to SSH into the jump box from now on!
# Add ForceCommand to prevent interactive shell access
echo "ForceCommand /sbin/nologin" >> /etc/ssh/sshd_config
3. Finally, I restarted the SSH service to apply my changes.
rc-service sshd restart
After this, I tested the login again from my laptop. As expected, the connection was immediately terminated with a “This account is not available” message. This confirmed my ForceCommand was working perfectly.
Step 3: Building the Wall: Modern Firewalling with nftables and SSHGuard
With SSH hardened, I set up a firewall. I opted for nftables as a modern replacement for iptables and SSHGuard to automatically block brute-force attacks.
nftables Configuration
1. First, I installed the packages.
apk add nftables nftables-openrc
2. Next, I created a simple but effective ruleset at /etc/nftables.nft. It drops all incoming traffic by default but allows traffic for established connections and, crucially, new SSH connections. It also defines a set called sshguard_blacklist that SSHGuard will use to add malicious IPs.
cat <<'EOF' | tee /etc/nftables.nft
#!/usr/sbin/nft -f
flush ruleset
table inet filter {
    set sshguard_blacklist {
        type ipv4_addr
        flags timeout
    }
    chain input {
        type filter hook input priority 0;
        policy drop;
        ct state {established, related} accept
        ct state invalid drop
        iifname "lo" accept
        ip protocol icmp accept
        ip6 nexthdr icmpv6 accept
        ip saddr @sshguard_blacklist drop
        tcp dport 22 accept
    }
    chain forward {
        type filter hook forward priority 0;
        policy drop;
    }
    chain output {
        type filter hook output priority 0;
        policy accept;
    }
}
EOF
3. To make sure the Alpine Linux service loaded my custom file, I uncommented the relevant line in its configuration.
sed -i 's/^#\(rules_file="\/etc\/nftables.nft"\)/\1/' /etc/conf.d/nftables
SSHGuard Configuration
1. I installed SSHGuard.
apk add sshguard sshguard-openrc
2. Then, I configured it to use the nftables backend.
cat <<'EOF' | tee /etc/sshguard.conf
# Backend: Use the nftables backend that works with sets
BACKEND="/usr/libexec/sshg-fw-nft-sets"

# Files to monitor (Alpine default for SSH logs)
FILES="/var/log/auth.log"
EOF
Enabling the Services
With everything configured, I enabled and started the nftables and sshguard services. I started with nftables first and added a quick check to make sure my custom rules were loaded correctly before starting the service that depends on them.
# Enable and start the firewall
rc-update add nftables default
rc-service nftables start
# Verify the ruleset is active
nft list ruleset | grep sshguard_blacklist
The verification command should output the line defining the sshguard_blacklist set. With the firewall confirmed to be active and correct, I then enabled and started SSHGuard.
# Enable and start the brute-force protection
rc-update add sshguard default
rc-service sshguard start
Step 4: Keeping it Fresh: Automated Updates
A secure server is an updated server. I’ve set up a daily script to handle updates automatically. If I’m logged in, it won’t reboot; instead, it adds a warning message to the Message of the Day (MOTD) that I’ll see on my next login, but it runs daily so it will probably reboot the next day and the message will be removed before the reboot, if nobody is logged in.
1. I created the script at /etc/periodic/daily/apk-autoupdate.
cat <<'EOF' | tee /etc/periodic/daily/apk-autoupdate
#!/bin/bash
LOG_FILE="/var/log/apk-autoupdate.log"
# Function to run apk upgrade and prefix each line with a timestamp
run_and_log() {
  apk upgrade --update 2>&1 | while IFS= read -r line; do
    printf "[%s] %s\n" "$(date '+%a %b %d %H:%M:%S %Z %Y')" "$line"
  done
}
# Run the update and log it
run_and_log >> "$LOG_FILE"
# Check for active non-root user sessions
if [ -z "$(ps -o user= | grep -v 'root')" ]; then
  echo "No users logged in. Rebooting to apply updates." >> "$LOG_FILE"
  # Clean up the reboot message from the MOTD if it exists
  sed -i '/^\x1b\[31m\*\*\* System has been updated and a reboot is required. \*\*\*\x1b\[0m$/d' /etc/motd
  reboot
else
  # ANSI color codes: \e[31m for red, \e[0m to reset.
  MSG="\n\e[31m*** System has been updated and a reboot is required. ***\e[0m"
  echo "Users are logged in. Deferring reboot and adding message to /etc/motd." >> "$LOG_FILE"
  # Add the reboot message to the MOTD if it's not already there
  grep -q "reboot is required" /etc/motd || echo -e "$MSG" >> /etc/motd
fi
EOF
2. And made it executable.
chmod +x /etc/periodic/daily/apk-autoupdate
Step 5: Using the Jump Box in Practice
With myjumpbox all set up, putting it to use is the easy part. Here are the two main ways I use it, with examples based on my helper scripts.
Connecting to Other Servers
The primary purpose of a jump host is to act as a secure stepping stone to other machines on my network. I use SSH’s native ProxyJump feature (-J) to transparently connect through the jump box to a final destination.
A direct command would look like this:
ssh -J myusername@<jump_host_ip> user@<destination_server_ip>
To make this even simpler, my sshjump.sh script wraps this logic, allowing for a much shorter command.
- Reference Script: sshjump.sh on GitHub
Secure Web Browsing with a SOCKS Proxy
The other key feature is creating a secure tunnel for my web traffic. By creating a dynamic SOCKS proxy with a single command, I can route my browser’s traffic through the encrypted SSH connection to myjumpbox.
First, I start the proxy in a terminal (it will run in the background):
ssh -N -D 1080 myusername@<jump_host_ip>
Then, in another terminal, I can launch a browser configured to use it. For example, with Chromium:
chromium-browser --proxy-server="socks5://localhost:1080" --new-window
My proxy-browser.sh script automates this entire process, starting the proxy and launching a pre-configured browser profile with one command.
- Reference Script: proxy-browser.sh on GitHub
The Payoff: Ridiculously Low Resource Usage
So, was it worth it? Absolutely. After getting everything set up on my Lenovo ThinkCentre M92p Tiny (with an Intel(R) Core(TM) i5-3470T @ 3.60 GHz CPU and 16GB of RAM), I checked the container resource usage in Proxmox, and the results were astounding when using it for a SSH jump or as SOCKS proxy:
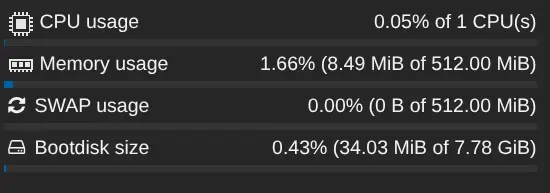
- Memory Usage: Less than 10MB of RAM.
- SWAP Usage: It uses none, but it’s there, just in case.
- CPU Usage: Under 1% of a single virtual CPU core. However, when I’m actively using my proxied browser to download a large file, it maxes out the single core I assigned to it, but it still delivers a respectable 40 MByte/sec on my 1 Gbit/sec connection.
- Disk Usage: A bit over 34MB.
This is exactly the kind of lightweight, set-it-and-forget-it solution I was looking for. It’s a powerful and secure tool that uses a tiny fraction of the resources a full VM or a more complex VPN setup would require.
Buy me a coffee 🙂
If you found this post helpful, informative, or if it saved or made you some money, consider buying me a coffee. Your support means a lot and motivates me to keep writing.
You can do so via bunq.me (bunq, iDeal, Bankcontact and Credit- or Debit cards) or PayPal (PayPal and Credit- or Debit cards). Thank you!
Disclaimer
The blog posts, guides, and scripts provided on this website are for informational and educational purposes only. They are provided “as is” and without any warranty of any kind, either express or implied, including, but not limited to, the implied warranties of merchantability, fitness for a particular purpose, or non-infringement.
By using the information or scripts from this blog, you agree that I am not liable for any direct, indirect, incidental, consequential, or any other damages or losses arising from the use of or inability to use the information, scripts, or instructions contained herein. You assume full responsibility for any and all risks associated with the use of this content.
The blog posts, guides, and pages may contain referral/affiliate links. If you make a purchase through these links, I may receive a commission at no additional cost to you.